Other Z Spacer Solutions
The following machines only need to loosen the leveling screws and re-level after installation.
- AnyCubic Photon Mono* (some Mono users did not have enough clearance, use this spacer if needed: Download Photon Mono Spacer )
- Creality Halot One Plus
- Creality HALOT-ONE PRO
- Creality LD-002H
- Creality LD-002R
- Creality LD-006
- Elegoo Mars 3 Ultra
- Epax X1* (some X1 users did not have enough clearance, use this spacer if needed: Download Epax X1 Spacer )
- Epax X10
- Epax X133
- EPAX3D E10-14KW* (If you need extra room, loosen the Z-Limit interceptor arm screws and lower it to its bottom position, then re-tighten for an earlier stop)
- FlashForge Foto 8.9
- Flashforge Foto 9.25
- Longer Orange 10
- Longer Orange 30
- Peopoly Phenom
- Peopoly Phenom L
- Phrozen Sonic Mighty Revo (14K)
- Phrozen Sonic Mini
- Phrozen Transform
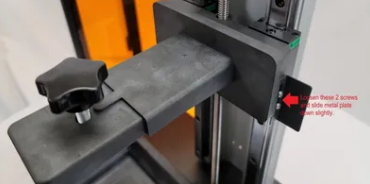
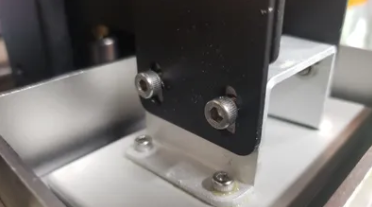
Epax E10 and E6, you need to adjust the optical sensor trigger plate then re-level
Locate the screws identified in the picture and loosen them enough to slide the metal plate down 2.6 mm so that it will trigger the optical sensor sooner to give enough room for the installed kit. Then relevel the build plate and you are good to go!
**Some E6 users did not have enough clearance, use this spacer if needed.
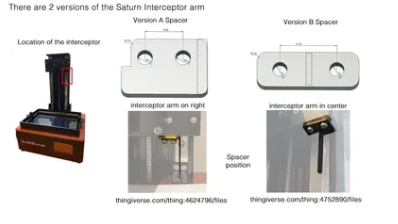
Elegoo Saturn
There are two versions of the interceptor arm on the Saturn and you can identify which you need using the picture.
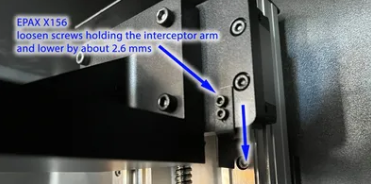
Epax X156 you need to adjust the optical sensor trigger plate then re-level
Locate the screws identified in the picture and loosen them enough to slide the metal plate down 2.6 mm so that it will trigger the optical sensor sooner to give enough room for the installed kit. Then relevel the build plate and you are good to go!